Using Power Automate with the Companies House API

Why this picture? Like all the pixel art on my website, this one is generated by OpenAI’s DALL·E 2. The prompt for this was “A row of Victorian clerks with a robot stealing a ledger in a sneaky way”. How does this relate to this article? Companies House evokes (in my mind at least) a huge library of records meticulously maintained by hardworking scribes beavering away with quill and ink while the robot symbolises our modern web tech filching their data. Yeah, my mind is a peculiar place!
A client asked whether I could investigate pulling data from Companies House using their API. This is still work in progress since ultimately the data harvested will be dumped into a database for later reporting using PowerBI. However, I thought it might be useful to document the process of using Microsoft Power Automate (my chosen tool for this task) to perform HTML GET operations via the Companies House API and parsing the subsequent JSON payload.
Step 1: Create an application & API key⌗
Visit: this link to create an application in your Companies House ‘Developer Hub’. If you don’t have an account, you will need to register first (it’s free). You can’t use your webfiling account (if you have one).
Fill in the new application form. It’s fine to choose ‘Live’ under ‘Choose an environment for your application’. Click the application name you’ve just created. In my example, it’s called GCF:

If you can’t find this page, here’s a handy link. On the next page, there should be a green Create new key button under the heading ‘Keys for this application’
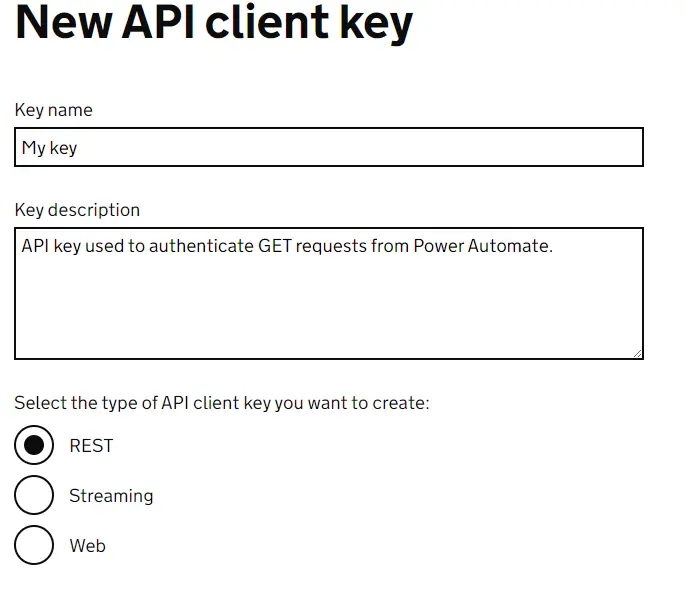
Give the key a name, a description and select REST as the API type and leave the remaining fields blank:

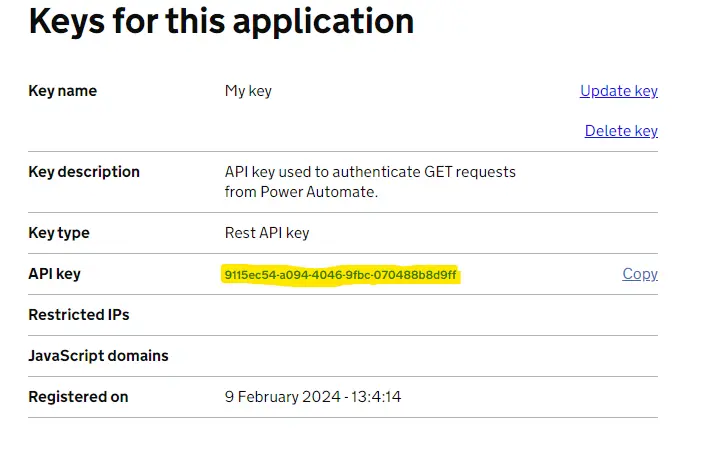
Then click the green Create Key button. On the next page, copy the API key. There is a ‘Copy’ link, but this didn’t work for me at the time of writing, so I had to highlight and copy the key manually:

You must now convert this key into base64 which will be used to authorise the GET request in Power Automate later.
Head over to base64encode.org
And paste your API key plus a colon (:). This is important because the API uses Basic Authentication without a password. The trailing colon is important because it adheres to the Basic Authentication standard, ensuring that the server can correctly parse the base64 encoded string and identify the username (or API key in this case) without expecting a password. Without the colon, the server might interpret the entire base64 encoded string as the username, leading to authentication errors.
Click the ENCODE button and you should end up with something that looks like this: OTExNWVjNTQtYTA5NC00MDQ2LTlmYmMtMDcwNDg4YjhkOWZmOg== Don’t try and use this key as it will be deleted by the time you read this article!
Step 2: Create a new flow in Power Automate⌗
Note that to use HTTP GET (required for this task), you will need a premium license. In my example, I’m going to use a simple manually triggered flow to see who holds charges for a given company on Companies House. In the future I will develop this flow to iterate through a spreadsheet of companies that my client is interested in, dumping out the retrieved data into an Azure SQL database for later reporting. But for now, we’ll keep it simple.
From your Power Automate homepage create a flow, using a manual trigger. Start from a blank ‘Instant cloud flow’:

Name your flow and select ‘Manually trigger a flow’, then click Create.

Step 3: Create an HTML GET action⌗
First, click on the ‘Manually trigger a flow’ action and in the flyout on the left, click ‘add an input’. Select Number, and type RegNo in the Number field, leaving ‘Please enter a number’ as the default. We will use this company registration number to query Companies House via their API to get the data we want:

Next, add an action in your flow by clicking the + button under the manual trigger. In the flyout, search for HTTP and select the HTTP action:

We are going to use the ‘charges’ ’list’ API request to return a list of charges for a company:
Click the newly added HTTP action in the Flow designer and paste this URL into the URI field:
https://api.company-information.service.gov.uk/company//charges
We need to supply the company registration number in our request, so click the space inbetween the forward slashes after company and before charges and select insert dynamic content:

In the pop up menu, click See More next ‘Manually trigger a flow’, then select RegNo in the list.

Select GET in the Method dropdown and type Authorization in the first Headers box where it says ‘Enter Key’. In the box next to it, type Basic then a space and then paste your base64 API key where is says ‘Enter Value’. You should end up with something like this:

Step 4: Parse JSON⌗
Add another step directly below your HTTP action, search for and add the Parse JSON action. In the configuration box on the left, click into ‘Content’ and click the lightning bolt icon to open the dynamic picker menu. Under HTTP select Body. The JSON schema we need to provide is a little tricky since Companies House don’t provide a JSON schema and the JSON chargeList resource they give cannot be used to generate one (you can generate a schema from it, but your flow will fail!). In the end I had to run my flow with just the manual trigger and HTTP action, examine the raw output from the HTTP action (the JSON payload sent by Companies House) and use that to generate the JSON schema. Once I had the JSON output, I added the Parse JSON action back and then clicked the ‘Use sample payload to generate schema’ in the Parse JSON action properties and it gave me this:
{
    "type": "object",
    "properties": {
        "etag": {
            "type": "string"
        },
        "total_count": {
            "type": "integer"
        },
        "unfiltered_count": {
            "type": "integer"
        },
        "satisfied_count": {
            "type": "integer"
        },
        "part_satisfied_count": {
            "type": "integer"
        },
        "items": {
            "type": "array",
            "items": {
                "type": "object",
                "properties": {
                    "etag": {
                        "type": "string"
                    },
                    "charge_code": {
                        "type": "string"
                    },
                    "classification": {
                        "type": "object",
                        "properties": {
                            "type": {
                                "type": "string"
                            },
                            "description": {
                                "type": "string"
                            }
                        }
                    },
                    "charge_number": {
                        "type": "integer"
                    },
                    "status": {
                        "type": "string"
                    },
                    "delivered_on": {
                        "type": "string"
                    },
                    "created_on": {
                        "type": "string"
                    },
                    "satisfied_on": {
                        "type": "string"
                    },
                    "particulars": {
                        "type": "object",
                        "properties": {
                            "type": {
                                "type": "string"
                            },
                            "description": {
                                "type": "string"
                            },
                            "contains_floating_charge": {
                                "type": "boolean"
                            },
                            "contains_fixed_charge": {
                                "type": "boolean"
                            },
                            "floating_charge_covers_all": {
                                "type": "boolean"
                            },
                            "contains_negative_pledge": {
                                "type": "boolean"
                            }
                        }
                    },
                    "persons_entitled": {
                        "type": "array",
                        "items": {
                            "type": "object",
                            "properties": {
                                "name": {
                                    "type": "string"
                                }
                            },
                            "required": [
                                "name"
                            ]
                        }
                    },
                    "transactions": {
                        "type": "array",
                        "items": {
                            "type": "object",
                            "properties": {
                                "filing_type": {
                                    "type": "string"
                                },
                                "delivered_on": {
                                    "type": "string"
                                },
                                "links": {
                                    "type": "object",
                                    "properties": {
                                        "filing": {
                                            "type": "string"
                                        }
                                    }
                                }
                            },
                            "required": [
                                "filing_type",
                                "delivered_on",
                                "links"
                            ]
                        }
                    },
                    "links": {
                        "type": "object",
                        "properties": {
                            "self": {
                                "type": "string"
                            }
                        }
                    },
                    "more_than_four_persons_entitled": {
                        "type": "boolean"
                    }
                },
                "required": [
                    "etag",
                    "charge_code",
                    "classification",
                    "charge_number",
                    "status",
                    "delivered_on",
                    "created_on",
                    "particulars",
                    "persons_entitled",
                    "transactions",
                    "links"
                ]
            }
        }
    }
}
Your configured Parse JSON action should look like this:

Step 5: Setting up the loops⌗
The JSON we are parsing has several nested arrays. We want to iterate through the list of charges for the company specified and then iterate through each charge to get the ‘persons entitled’. We are therefore going to have to set up two loops, one nested within the other.
Under the Parse JSON action, click the plus button and add an Apply to each action. The usual configuration box pops up from the left. First, rename the action (click on Apply to each) to Outer.
Now click in ‘Select An Output From Previous Steps’ and click the fx icon to the right. In the function box type:
outputs('Parse_JSON')?['body']?['items']
Then click Add. Your final config should look like this:

Next, click the plus button inside the grey box under the ‘Outer’ action

Add another Apply to each action and name this one Inner. Click in ‘Select An Output From Previous Steps’ and click the fx icon to the right. In the function box type:
items('Outer')?['persons_entitled']
Step 6: Create an add row to an Excel table action⌗
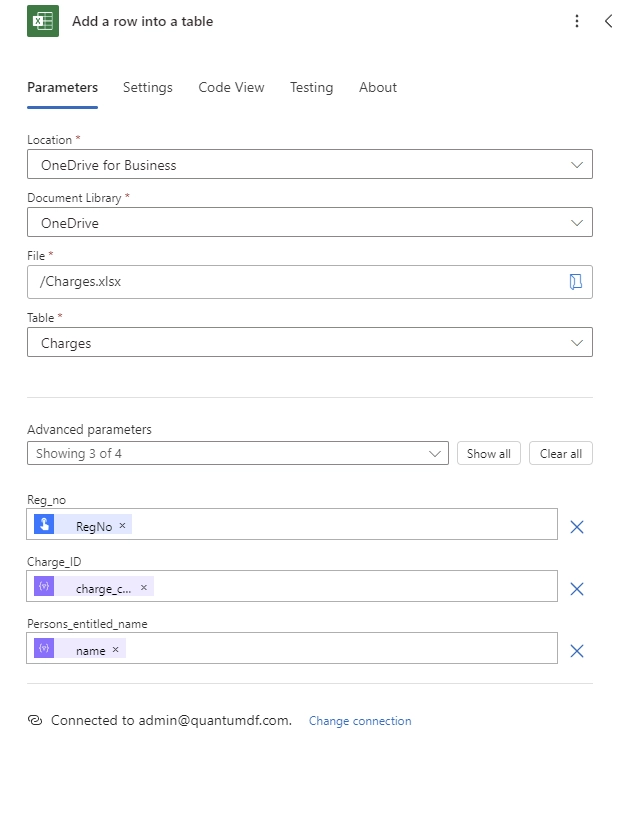
Create an Excel spreadsheet in OneDrive and create a table within this spreadsheet with the following headers: Reg_no, charge_ID and Persons_entitled_name. Now in your flow, click the plus button directly below the Inner loop, search for and add the Add a row into a table (Excel) action.
In the configuration box, select your spreadsheet (you may be prompted to authenticate to OneDrive) and select your table within your spreadsheet. Under ‘Advanced parameters’, use the checkboxes to show the three headers above (Reg_no, charge_ID and Persons_entitled_name).
In ‘Reg_no’, click the lightning icon, scroll down through the picker and select RegNo under ‘Manually trigger a flow’

In ‘Charge_ID’ click the fx button and enter the following:
items('Outer')?['charge_code']
In ‘Persons_entitled_name’ click the fx button and enter:
items('Inner')?['name']
The final config should look like this for the ‘Add a row into a table’ action:

And the final flow should look like this:

Step 7: Save and run your flow!⌗
Click the Save button. Your flow will be validated and saved. Now click Test. Select ‘Manually’, enter a valid company registration number and then click the blue Run flow button. If there are any charges for that company, the charge code will be written to the Excel table along with the ’entitled persons’.
Further considerations⌗
Future development of this flow will involve iterating through a list of companies my client is interested in, rather than having to manually enter a company registration number each time. Some error handling will need to be added to account for 404 ’not found’ returns by the API and some consideration will be needed for the default API limit of 600 requests within a five minute period.
☕️ If you found this post helpful, I’d appreciate it if you would buy me a coffee